Where can I find help in the ELN and how can I improve it?
In this blog post we will discuss where you can find help in the ELN and how you can help use improving the documentation.
How does the documentation in the ELN work?
If you have been using the ELN you might have been noticing that there is a question mark icon in the top left corner of some pages in the ELN. If you click on it, it will open a popup with help relevant to the view you’re currently looking at.
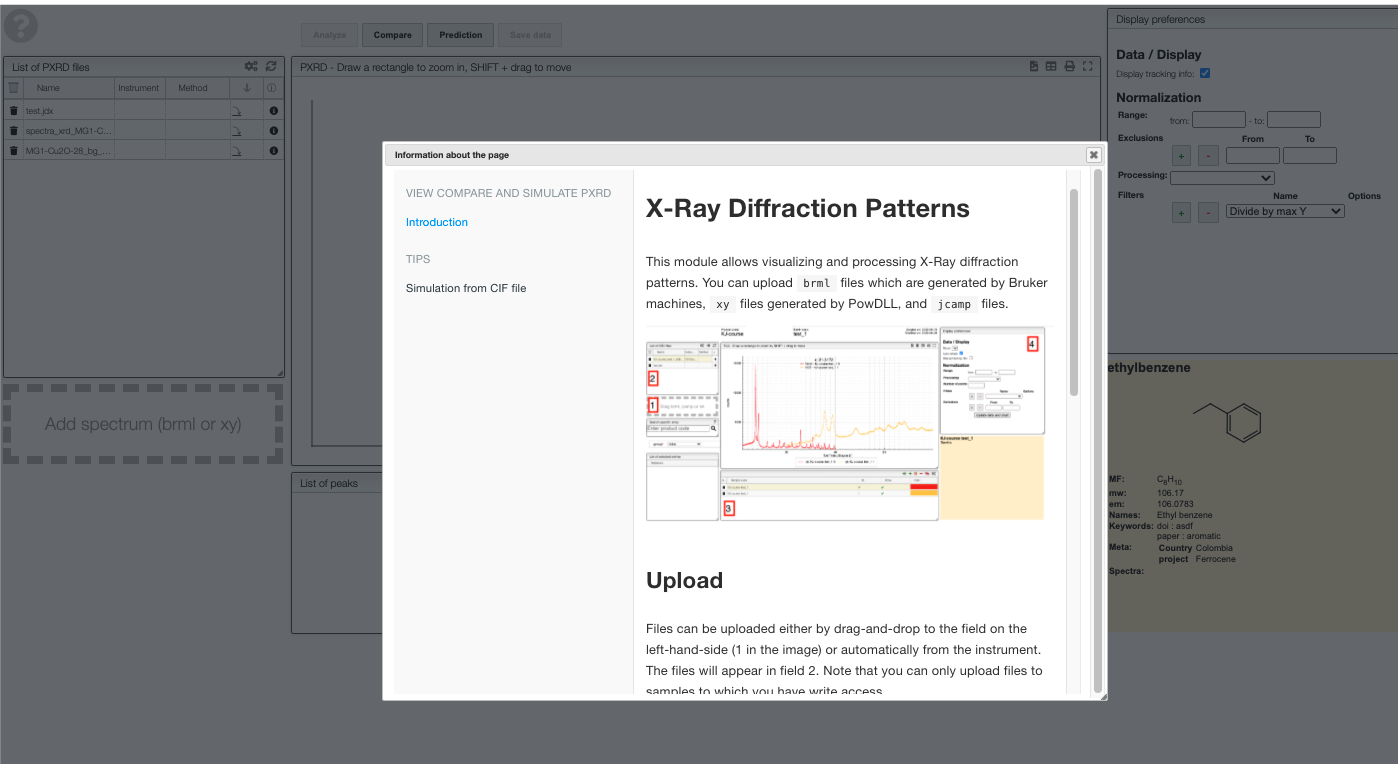
All of this is built using GitBook which allows converting markdown files into something that looks like an online book.
The core of the documentation is in the src/book folder of the c6h6-documentation repository where you can find subfolders for different categories.
Mapping views to documentation pages
You might now ask yourself how the mapping between the view in the ELN and the page in the documentation works. This is set up in index.yml files like this here for the PXRD documentation. The file contains one key called uuid which is the uuid of the view. If we analyze the requests the ELN makes using the network tab in the developer tools we find that this is indeed the UUID of the view.
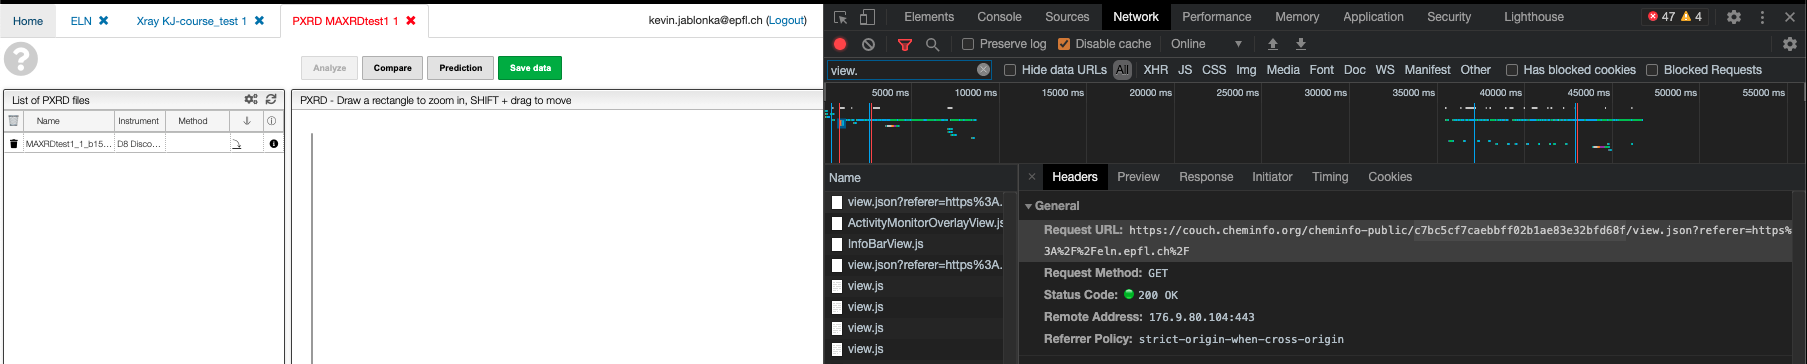
This is also what we find in the visualizer helper library: for a given view we get the UUID info._id and then can use this to find the correct yml file that configures the sections of the documentation.
async function showTips(info) {
  if (!info) info = await getViewInfo();
  if (!info._id) return;

  //  info._id='15c9a2dcd55c963fdedf2c18a1471b03';
  //  info.rev=90;
  // retrieve tips toc
  await fetch(`${tipsURL + info._id}/index.yml`)
    .then(async (response) => {
      let text = await response.text();
      processTipsToc(text, info);
    })
    .catch();
}
And the processTipsToc function is then the one that actually pops up the documentation.
How can I help improve the documentation
Since the documentation lives in simple markdown files on GitHub you can contribute by simply editing the markdown files. The process is, as with all contributions to projects on GitHub, fork, edit, pull request.
Getting started
To contribute to the documentation you need a GitHub account, you need to install Git locally, and we recommend that you install VSCode and a markdown plugin. The first points are explained in our contribution guidelines while latter is discussed in the first sections of our blog post about the development setup. Once you have all of this setup you can
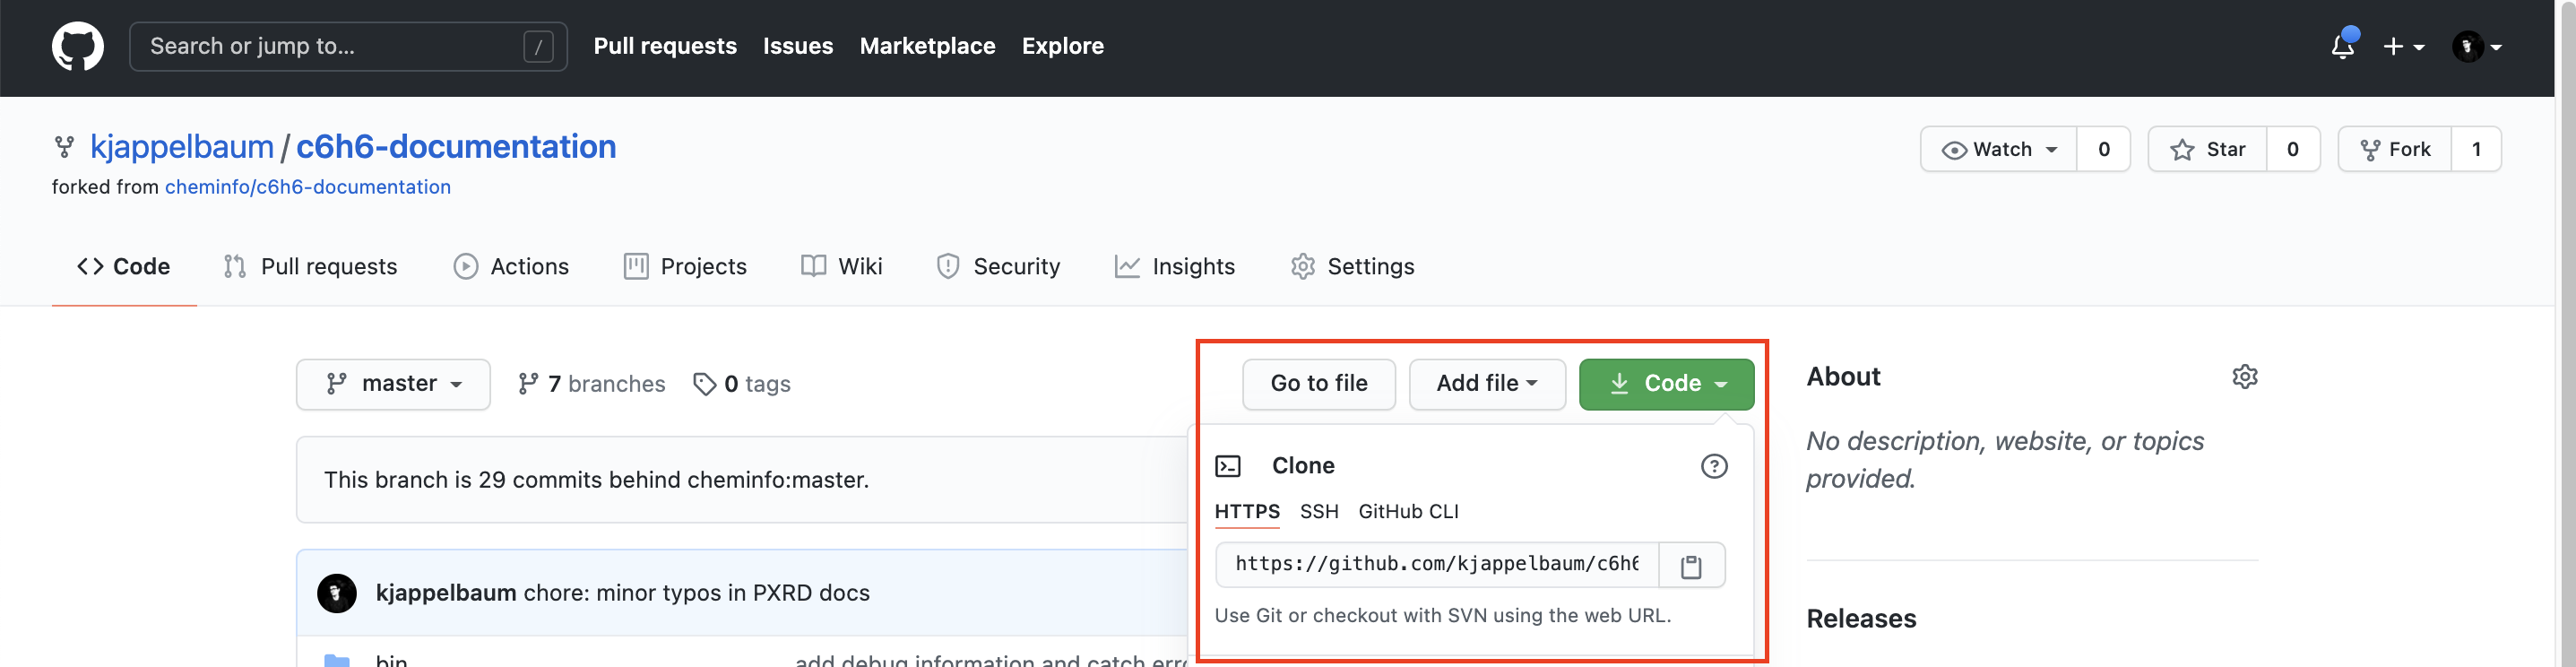
- Go to the c6h6-documentation repository and click on fork

-
In you fork (i.e., your personal copy) you can click on the “clone” button, copy the URL
In your terminal run
git clone <myurl>(in my casegit clone git clone https://github.com/kjappelbaum/c6h6-documentation). This will create a new folder in which you can go withcd c6h6-documentation. In this folder you can typecode ., which will open VSCode (note that is easiest to start with theHTTPSURL, if you get used to working with GitHub it can be useful to upload your SSH keys for authentication). On Windows you can perform these changes using command prompt -
In VSCode, you can use the footer to make new branch. Likely, it will write “master”.
If you click on this a small editor opens that allows you to make a new branch with a name of your choice. We recommend using a short name that describes the type of your change, e.g.,
fix-isotherm-docs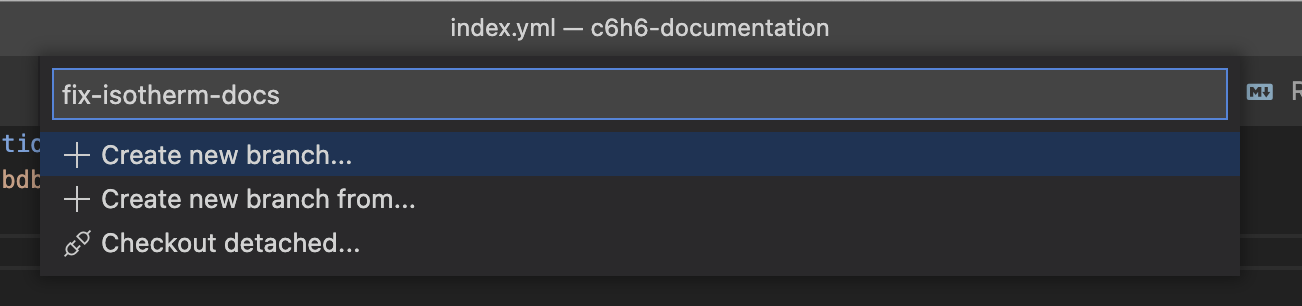
- Then you can start making the changes in the relevant files
- Using the version control icon in the activity bar on the left you can “stage” and then “commit” the changes you made. For this you can just write a message like
doc: fixed typos in the isotherm documentationand then click on the checkmark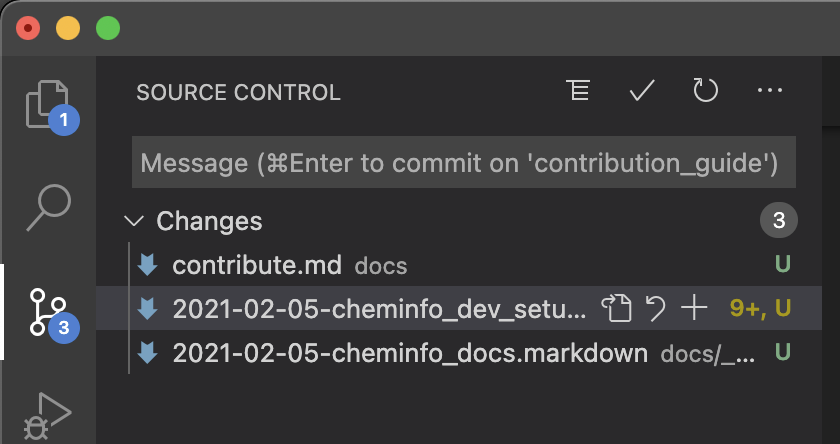
- Once you committed your changes, you can push them using the “synchronize changes” icon in the footer (status bar) of VSCode.
- Once you have pushed the changes you’ll see that there is a banner in your fork that gives you the option to make a pull request by clicking on a green button.

- If you can click this button, you’ll be directed to a from where you can describe your changes and make the pull request.
- We will review the pull request and merge it to the main branch. As soon as the pull request is merged, GitHub will also show you as “Contributor”.
Where do I make the changes?
At first, it might be intimidating to find the relevant files in the c6h6-documentation, but in practice it is easy to find the file you need to edit
I want to fix a typo or extend an existing page
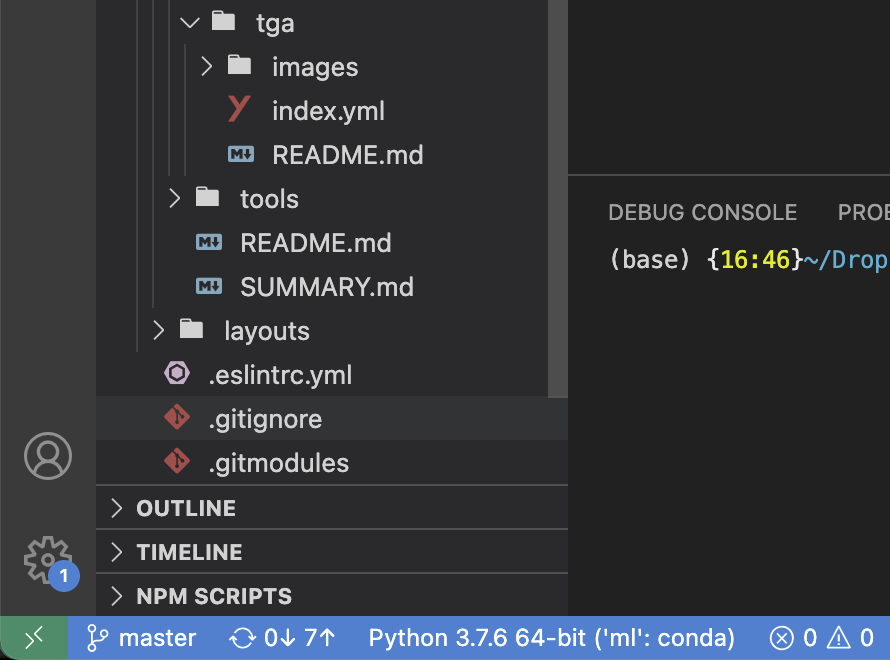
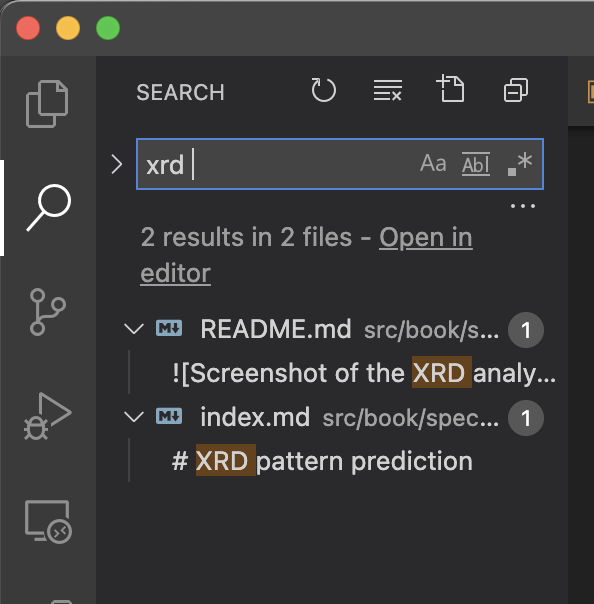
If there is also an existing page, you can just search across all files for some text from this page and VSCode will find the relevant file, in the screenshot below we only search for “XRD” and directly find the relevant files
I want to add a new page or new “tips” to an existing page
Adding a new page is slightly more difficult.
First, it is usually good to get inspired by existing pages. This is, if you want to add some documentation for IV curves you might find it practical to get started by copy/pasting the XRD documentation folder. If you want to add documentation for some spectra type, you’ll do so in src/book/spectra. You will create a README.md file with the main documentation content and a index.yml with the metadata—that is, the UUID of the view. As shown above, you can get it from the Network tab in the developer tools (which you can open using right-click on the page, then inspect)
You may have noticed that for some techniques there is not only one README.md file but also some folders. Those are the other sections that will appear as “tips”. For example, if you look at the PXRD documentation, you see that main README.md file will be shown as introduction (as on any other pages) but in the /src/book/spectra/pxrd/ directory we also have a subfolder called simulation that contains a index.md file that will be shown as additional section in the documentation. You can add an unlimited number of such subfolders which will show up as separate “tips”. Note that you have to add those tips to the index.yml file with a title and name. The title will be the title that shows up in the documentation in the ELN and the name is the name of the subfolder (please do not use spaces). An example of the complete index.yml file looks like
description: View compare and simulate PXRD
uuid: c7bc5cf7caebbff02b1ae83e32bfd68f
tips:
  - minRev: 95
    title: Simulation from CIF file
    name: simulation
and the folder in the /src/book/spectra/ directory looks like
pxrd
├── README.md
├── images
│   └── analysis.png
├── index.yml
└── simulation
    ├── index.md
    └── simulation.png
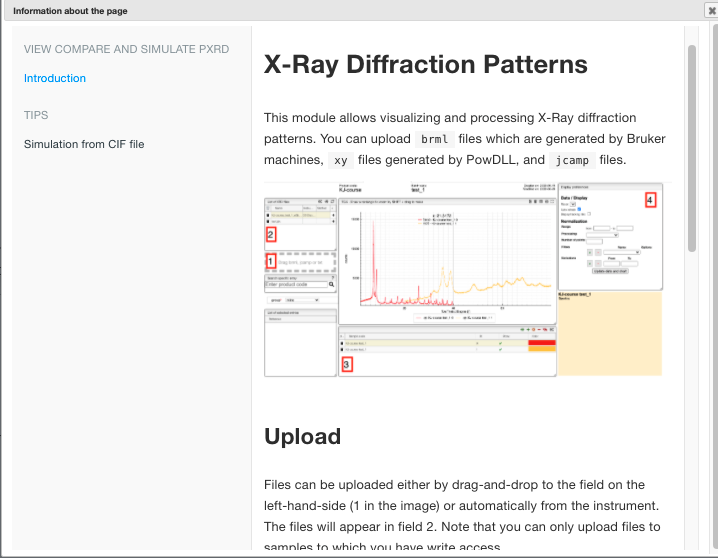
The description in the yml file is the title of the documentation section, the uuid is the UUID of the view that you can extract using the developer tools (as described above) and the tips lists contains all subfolders that you want to appear as separate tips (in this case, simulation). In the case of the PXRD documentation, the final product will look as follows
Basics of Markdown
Even if you now have the file you want to edit or create you still might wonder how you need to structure the file. All the files are written in Markdown, which in contrast to Microsoft Word or Google Docs follows the “what you see is what you mean” principle. That is, there is usually some syntax you need to use to format your text, e.g., to make it bold or to make a header. To make it easier to see what is going on, you can open the “Preview” in VSCode which will automatically update the document based on the markdown “code” you write.
The Markdown syntax is pretty easy and there only a few things you need to know to make contributions to the documentation:
- To create headings, markdown uses hashtags (
#). The number of hashtags indicates the heading level. That is, you might do something like
# Section

## Subsection

### Subsubsection
And markdown will automatically adjust the font size for you and these headings can also be used for navigation or to create a table of contents.
-
To add a hyperlink you will use
[linktext](link), if you want to link to google you might write something linkfor more details you can just [google](www.google.com) it. - To make something bold you can use double underscores
__bold__ - To italicize something you can use stars
*in italics* - To add an image you use syntax that is quite similar to the hyperlink syntax
 - If you need to add some formula you can use our LaTeX generator tool that will give you an “URL” that you can use with the image syntax, e.g,
will yield
It is often practical to include screenshots. macOS, Windows, and Linux all have useful tools and keybindings to create screenshots:
- On Mac you can simply use
CMD+SHIFT+4and draw a rectangle around the area of interest. By default, screenshots are saved on the desktop, and you can use Preview to add highlights and annotations. - On Windows you can use the Snipping Tool for this you only need to press the “Start” button and search for “snipping tool”. Similar to the Mac tool you can select an area or capture the full screen. You can also directly annotate the screenshots.
- On Ubuntu you can just press the
Prt Scrnbutton and will find a screenshot in yourhomedirectory. But you can also search for screenshot and use a utility that allows to select a region of interest.
Note that there are also some Chrome Plugins that allow you to take screenshots directly from the browser. Some even allow you to record short screencasts.
It is good practice to make a folder images for the images you add to the documentation.
Hands on walkthrough
In the short video below we show you how you fork the c6h6-documentation repository, make a new branch, make and commit changes to the documentation and then make a pull request.